Example of Git in Project Work
Scope
This article's purpose is to help explain the basics of using Git and GitHub as part of your project workflow while working within the Metworx platform.
Overview of Using GitHub for Project Work
The general steps to maintaining a peer-reviewed artifacts, such as code or reports, on GitHub are as follows:
-
Create a Git repository (aka repo) which will be used to store all project related artifacts (via GitHub).
- Once a Git repository is created, it can be cloned to a user's workstation so they can continue their work locally.
- Create a working branch (off the
mainormasterbranch) for new work in the project's Git repo (via GitHub). - Add artifacts and commit updates to the the repo (via RStudio, the Command Line Interface (CLI), or Github)
- Create a pull request (PR) so changes can be reviewed by others (via GitHub).
- Pull request reviewed by other collaborators, adding comments, requesting changes, etc (via GitHub).
- Reviewer(s) approve the PR after changes get reviewed (via Github).
- Merge the PR into the
mainormasterbranch (via Github).
Each of these steps are described in more detail below, with instructions to execute each step included.
NOTE: Originally, the name of the initial default branch for a repository was master, but that was recently changed to main (as shown here in GitHub's documentation). This document refers to both, in case you are exposed to some older repositories still utilizing the master branch as the repository's default branch.
Creating a Repository In GitHub
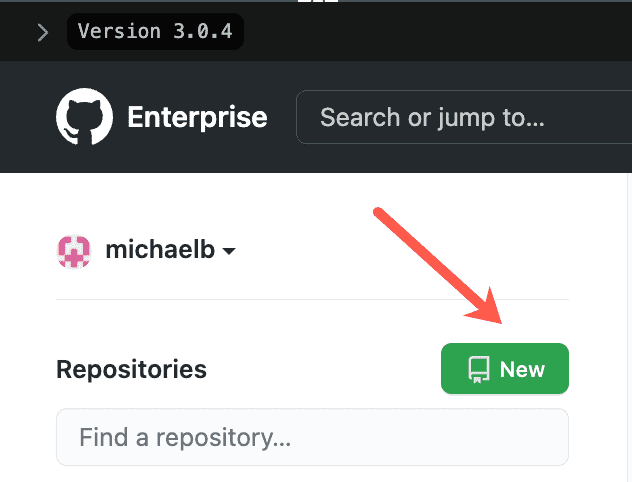
After you log in to your GitHub account, you will see Repositories on the left-hand side of the screen.
Click the green New button:
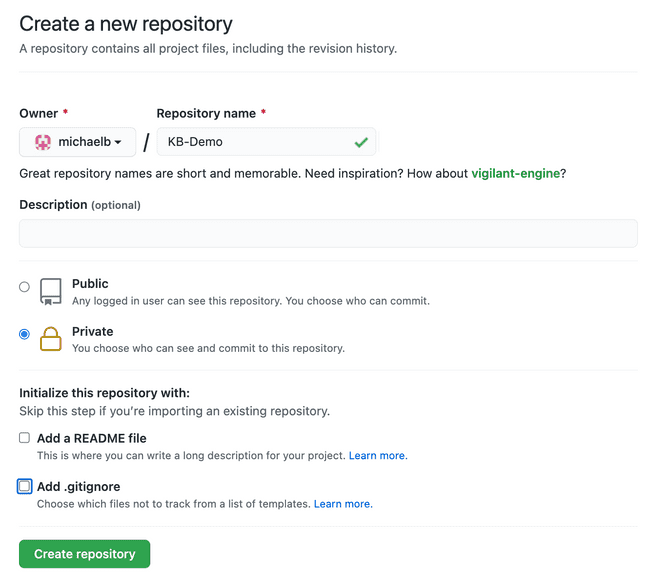
You will then be prompted to create a new repository:
- First, give your a repository a name.
- Next, select whether you want the repo to be public or private.
-
Then, choose how you would to initialize your repo.
- You can add a README file to include a description for your project.
- You can also add a
.gitignorefile to choose which files not to track from a list of templates.
- Once you are ready, click the green Create repository button.
This will result in a successful creation of your new repository.
Adding Collaborators to Repository
To add collaborators, or people who can contribute to your repo:
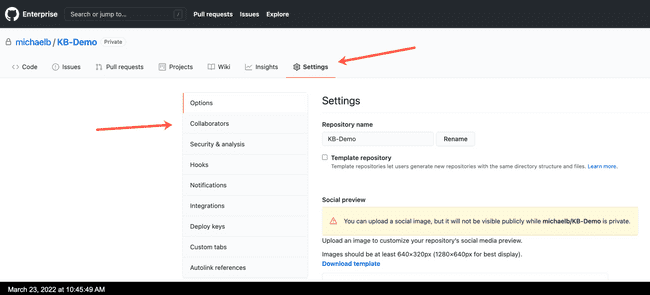
- Click the Settings icon
- Then click Collaborators on the left-hand side:
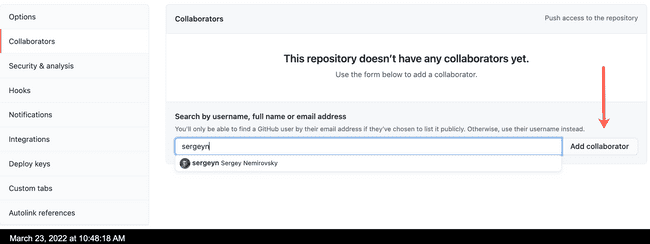
- Then, simply begin typing in the name of the person you'd like to add as a collaborator, and their full name should auto-populate.
- Select that person and then click the Add collaborator button:
This will successfully add that person as a collaborator to your newly created repo:
Cloning a Repository
Cloning a Repository via Command Line Interface (CLI)
To work on a repository locally, you will need to clone the Git repo from GitHub to your machine. This will allow you to make changes to the repo in your preferred working environment, rather than via the GitHub user interface (which is, admittedly, not too conducive to most work types).
To clone a repository via the CLI, follow the following steps:
-
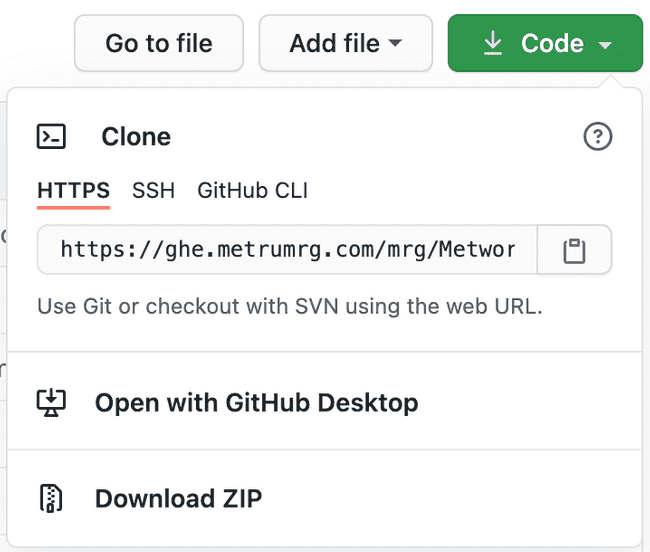
First, in the GitHub interface, click the green Code button
- Then, you can either clone using the HTTPS or SSH url. Select either the "HTTPS" or "SSH" option in the Code drop-down.
- Copy the url
- In your terminal type
git clonethen paste the url you copied in the previous step and execute.
The final command in your terminal will look like:
git clone <HTTPS_or_SSH_repository_url>Create a New Branch
Create a New Branch via GitHub
To create a new branch on GitHub:
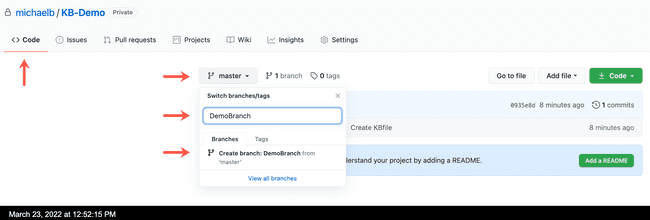
- Click on the Code tab
- Then, click the drop-down tab that says
masterormain. - Then, give your new branch a name and click Create branch: YourBranchName from
masterormainto successfully create your new branch:
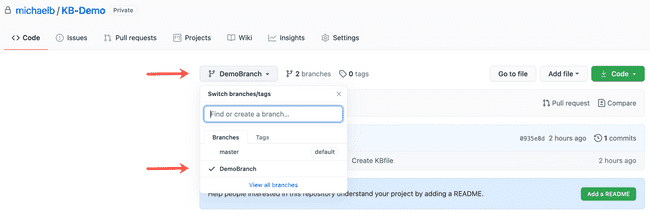
Now, your new branch will be available to select from the branch list and you can perform work on it.
You can use this method to select the branch you just created, or other branches that are within the repo.
Create a New Branch via Command Line Interface (CLI)
To create a new branch via the CLI, in your terminal, execute the following command:
git branch <branch_name>To switch to the branch you just created or a different branch, execute the following:
git checkout <branch_name>To view the branch you have selected currently, execute:
git branchCreate a New Branch via RStudio
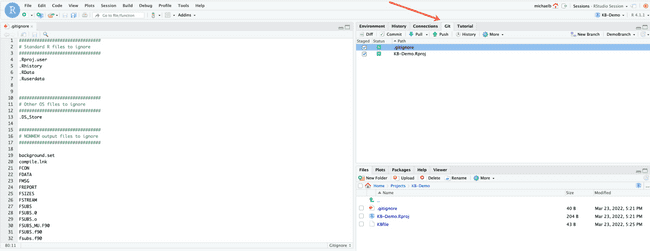
Within in RStudio, there is a Git tab that can be utilized to perform Git actions. It can be used as an alternative to interacting with Git via the CLI in RStudio's Terminal. The Git tab is typically located in the top right-hand corner of your RStudio IDE.
To create a new branch using RStudio's Git functionality, click the New Branch button.
To select a branch, click on the drop-down menu listing the branches and select the branch you wish to work on.
Creating a Commit
A key part of Git commits are the messages users leave to summarize the change they made associated with that commit. Industry standards have been established to help structure these commit messages so they are easier to read and understand at a glance.
Linked is a resource summarizing standard commit conventions: https://www.conventionalcommits.org/en/v1.0.0/
Creating a Commit via GitHub
To make and commit any changes or updates to a file/code:
-
First, select the pen icon in GitHub to edit your file:
-
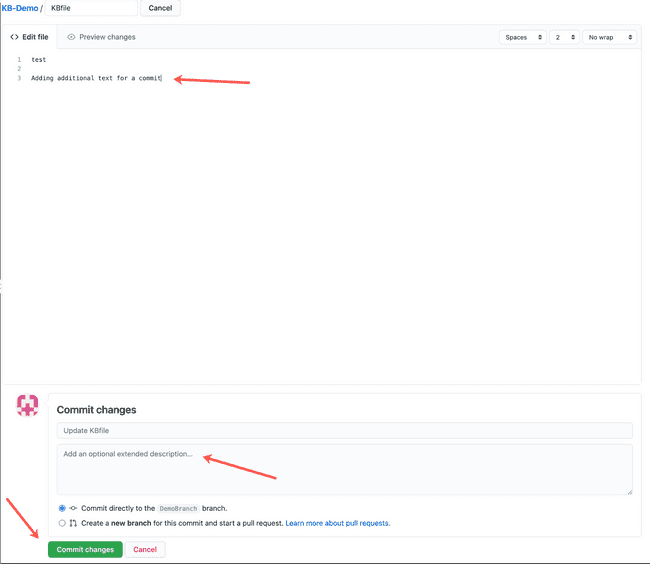
Then, make your changes to your file within GitHub. An additional line of text was added in this example:
-
Then, add a commit message in the "Commit changes" section.
- There is an option to add an optional extended description to describe what is being changed in this particular commit.
- Chose whether you'd like to commit directly to the branch you're currently working on or create a new branch for your commit and start a pull request.
- Once satisfied, click the green Commit changes button to make your commit.
Creating a Commit via the Command Line Interface (CLI)
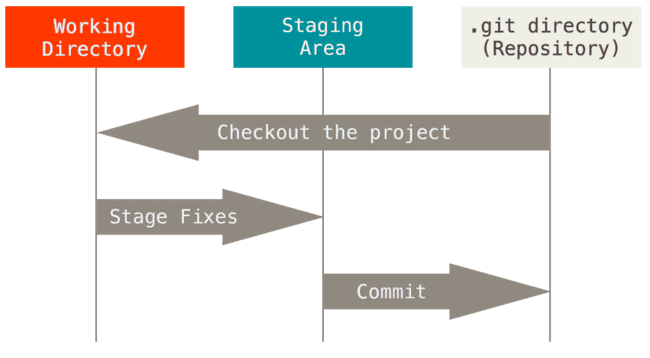
Before committing your changes, you must first stage them. In doing so, you are shifting your files from the working directory (where you made your changes), to staging area. When you move an item to the staging area, you are preparing it to be a part of your next commit.
The diagram below is included to help visualize the concepts. To learn more, click here.
Execute the following to stage your files and prepare them for your next commit:
git add example.file If you want to remove a file from the staging area, execute:
git rm example.fileTo create a commit via the CLI, in your terminal, execute the following command:
git commit -m Example Commit MessageThis will commit all the files in your staging area to your repository.
If you are working locally on your repository and want to add the changes to the repository's remote location on GitHub, execute:
git pushCreating a Commit via RStudio
- In RStudio, select the Git tab (typically located in the top right-hand corner of the screen).
-
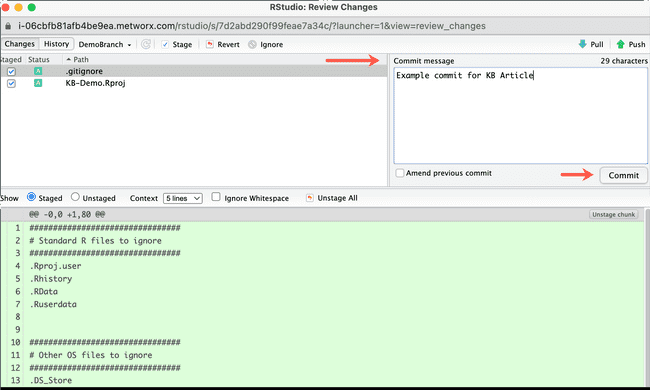
Select the files in which you edited and want to commit the changes for by checking the box next to the file name. Then, click the Commit button.
-
You will then see a new window pop up titled RStudio: Review Changes. You can review the staged files that are being added/committed. Also, you can add a commit message. Then, click the Commit button.
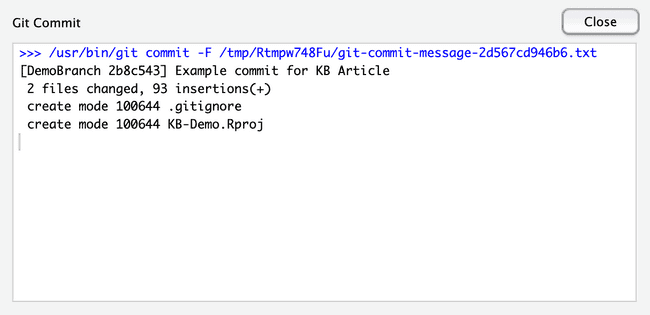
- You will then see the commit go through successfully:
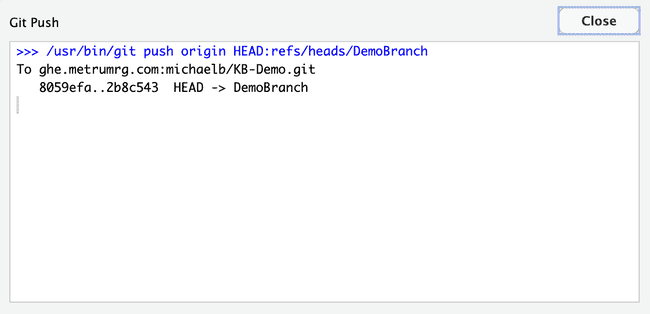
After you have committed your changes locally, to have your changes reflected in repository's remote location in GitHub, you want to push your changes. To push your changes in RStudio, simply click the Push icon:
You will then see a new window pop up that shows your push go through successfully:
Opening, Reviewing, and Merging a Pull Request (PR)
Opening a Pull Request (PR) via GitHub
After you've committed your change, the on GitHub, page will refresh and you will see a prompt similar to the one shown below:
The prompt states that your branch had a recent commit to it and a button to Compare & pull request will be available. Click the green Compare & pull request button to create a pull request.
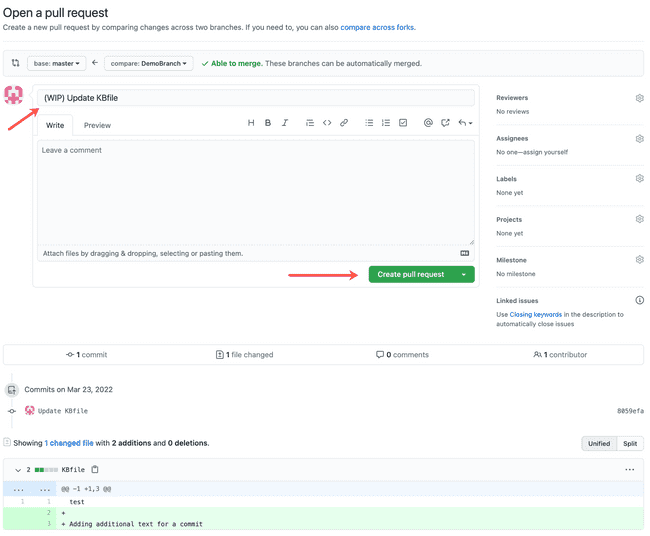
You will then be directed to a page where you can Open a pull request.
-
Add a title to your pull request
- It is best to add (WIP) - Work in progress to the start of your pull request's title to make it clear that it is being worked on.
- You should remove the (WIP) from the title once your PR is ready for review.
- Optionally, you can add a comment that describes the PR you are creating.
- Once you are ready, click the green Create pull request button.
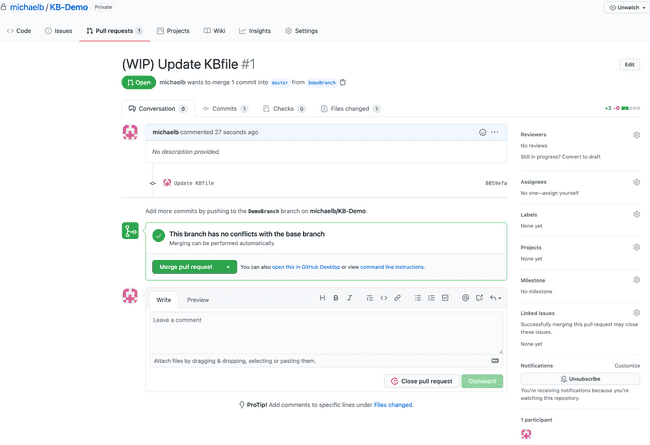
This will result in the successful creation of a new, open pull request. The screenshot below shows a successfully created pull request on GitHub:
Reviewing a Pull Request (PR) via GitHub
It is best practice to assign a reviewer(s) to look over your pull request before merging.
A reviewer can make comments and suggest/request changes to your code as they look over the changes you are proposing in your pull request.
To add a reviewer to your pull request:
-
Click Reviewers on the right-hand panel in GitHub:
- In the search bar, type the name of a person to review your pull request and it will auto-complete.
-
Select that person's name and click anywhere outside of the search bar to finalize it:
- The person will then be officially added as a reviewer to the pull request. The pull request cannot be merged until reviewed and approved.
Once satisfied, the reviewer will approve the pull request, setting it up to be merged.
Merging a Pull Request via GitHub
To merge a pull request into your main or master branch (or whatever other branch you have selected as your base branch for your merge):
-
Click the green Merge pull request button:
- You'll then be prompted to give your merge a title and description.
-
Once ready, click the green Confirm merge button:
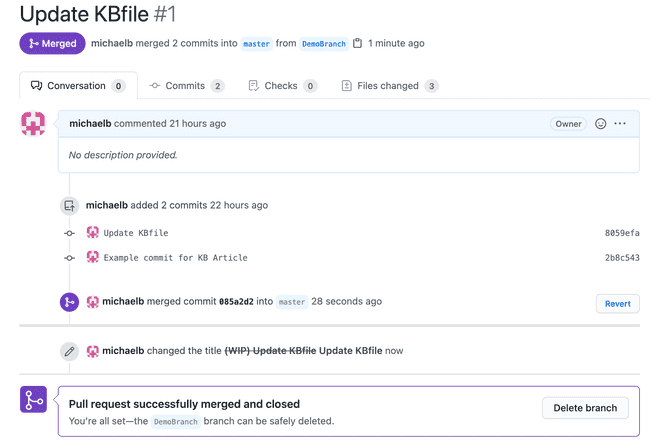
- Once complete, you'll see your pull request has been successfully merged into the base branch you set (again, often this will be the
mainormasterbranch). - You can then safely delete your working branch after it has been merged by clicking the "Delete branch" button.
Merging via Command Line Interface (CLI)
To merge one branch into another via the CLI, follow the sequence laid out below. This is covered in more detail in this article on merging in Git.
- Checkout the branch you want to merge into another branch (often a working branch)
git checkout <working_branch_name>- Execute a pull to make sure that branch is up to date
git pull- Switch to the branch you want to merge into (often
mainormasterbranch)
git checkout main- Merge your working branch into the branch you just selected
git merge <working_branch_name>