Sharing an App
In this doc we will cover how to share the app that you have published with other users.
Creating users
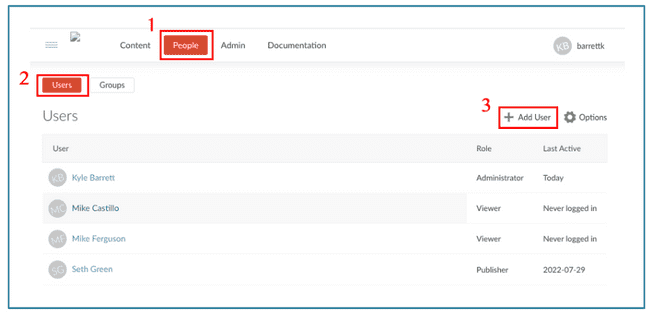
- In the RSConnect dashboard, click the "People" tab and select "Add User".
- Fill in the each of the sections with the user's information.
- If they only need to view the app, set their role to "viewer". However, if they plan to collaborate (i.e. deploy an app from their end), they will have to be set as a "Publisher" or higher.
-
After you create the user, the they will get an email with steps to create an RSConnect account.
- Note that the account they are creating is associated with your workflow only.
- Users will have to be added to each server (i.e. workflow) hosting shiny apps that they need access to. In other words, if you have a single dedicated workflow for hosting all your shiny apps, they will only have to create the one account.
Creating a Group
If you have many visitors you make want to look into creating a Group. To do so, navigate to the People tab as before, and select Groups:
- Once there you can name the group and add all relevant personnel:
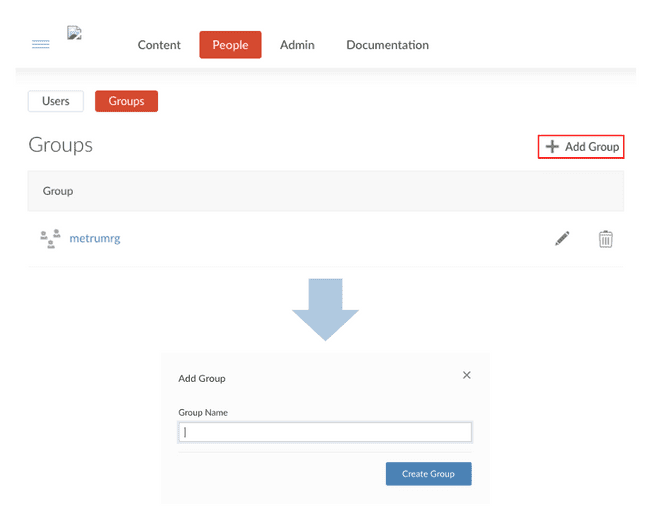
- After creating the group, you can add the group/change permissions the same way you would an individual user:
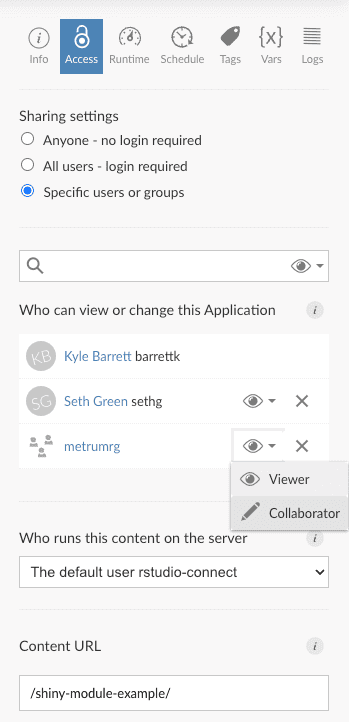
Setting User Access
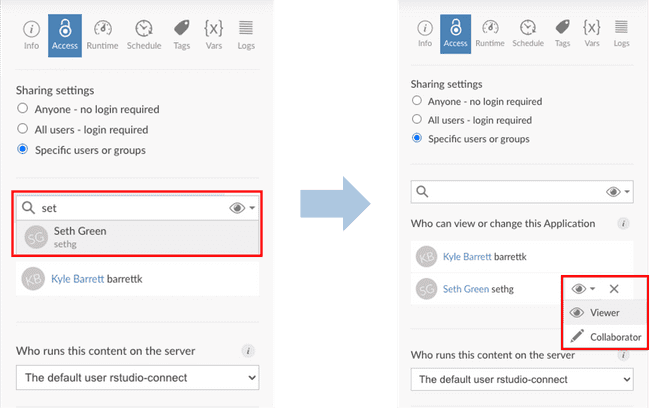
The above steps will register a particular user or group with your workflow. However, they still need to be given access to specific apps. To do this, navigate to the Access panel within the desired shiny app. As seen below, you can add any users (or groups) by beginning to type their name. Once added you can choose whether they are a viewer or collaborator. See Additional Publishing Scenarios" for more information on collaboration.
Sharing URL with users
Users will access your app via the URL of the workflow where it is hosted. This URL will be <hostname>/rsconnect/<app-name>, as shown below.
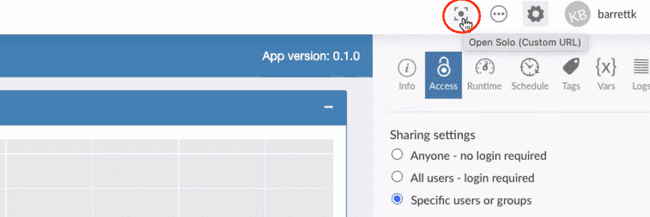
To get to this URL from the RSConnect dashboard, and to preview your app as users will see it, click the "Open Solo" button in the top-right:
Setting a custom URL
It's simple enough to change the app name, or "vanity path" as shown in Additional Publishing Scenarios. However, the beginning of your URL will still contain the hostname, which is tied to a specific Metworx workflow. If you shut down the workflow that is hosting the app and restart a new one, this URL will change, and the original URL will no longer work for anyone who you have previously shared it with.
The solution to this is to register a custom hostname. To do this, you will have to submit a Metworx Support ticket. You will need to include the URL of your workflow (e.g., https://i-082b69c420828c997.metworx.com/) and requested hostname (e.g., <desired hostname>.metworx.com) to make this happen. The Metworx team will set this up for you and let you know when it is live for users.
Note that, if you shutdown the hosting workflow and restart another one, you will have to file another support ticket to register the new Metworx hostname (again, this will be something like https://i-0386cb86741385b83.metworx.com/) with the same hostname that you previously used. Once you have done this, users can continue to use the URL you had previously given them.
As a final note, domains have to be metworx.com. This can be done regardless of whether your company has a private subnet or not.
