Working with ssh public/private keys
1. Summary
This document describes generating ssh public/private key pairs.
SSH public / private keys are used by ssh, scp and sftp protocols to authenticate. When connecting to a server, a user must provide a private key. In turn, a server must have the corresponding public key in the user's home .ssh/authorized_keys file.
It is assumed that if a Windows workstation is being used to connect from, Putty, WinSCP and PuttyGen applications are installed on the workstation. This tutorial and example describes creating ssh public/private key pairs, installing public key to a workflow's owner authorized_key file, and authenticating to the workflow with a corresponding private key.
2. SSH Key Pairs
For Security reasons, authentication via ssh protocols to a Metworx workflow is only allowed via public/private key pairs. To allow user access, a user's ssh public key has to be in the user's authorized_key file, i.e in ~/.ssh/authorized_keys
There are multiple ways to add the public key to that file, and in this document we will discuss 2 options:
- Creating public key pair in AWS console and configuring ssh key in Metworx Dashboard application user configuration.
- Creating public key on a user's workstation and inserting public ssh key to already running Metworx workflow.
2.1. Configuring ssh key in Metworx User Configuration
On the Metworx Dashboard application, a user has an option to have a user-level key defined. If the user-level key is defined, that public key will be inserted in the user's home .ssh/authorized_key file at the workflow creation time.
If a user does not have a user-key defined, then a required Organization-level key will be used instead and the ssh access to the workflow will be limited to system administrators only (assuming that only system administrators have access to the Organization private key)
Metworx-Cloud users can request a user-level ssh key configured by submitting a ticket in the Metworx Support Portal
In Metworx dashboard application, a user or organization administrator can configure the AWS Key Name
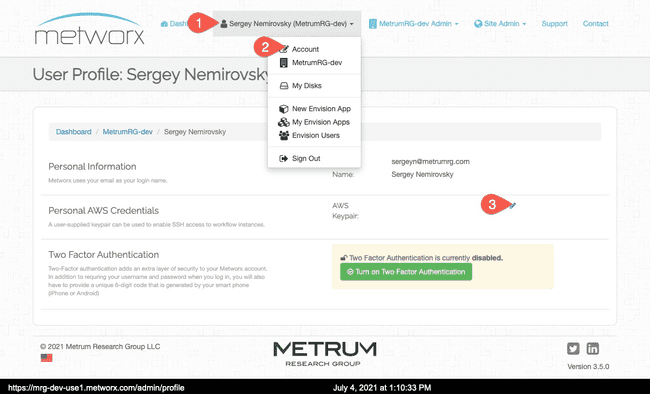 . The name in the user configuration in Metworx and the name given to the key in AWS must be the same!
AWS documents several ways to create key pairs. Please Refer to AWS documentation for additional information:
- Console: https://docs.aws.amazon.com/AWSEC2/latest/UserGuide/ec2-key-pairs.html
- CLI: https://docs.aws.amazon.com/cli/latest/userguide/cli-services-ec2-keypairs.html
Follow these steps to create the ssh key pairs in AWS via console:
Usually, when a new user is added to Metworx, the cloud administrator (or somebody who has admin level access to AWS) can create a new ssh key and associate that key with the user in Metworx. To create the key in AWS console:
- Log in to AWS console web application, go to Services->EC2, and confirm that you are in the right AWS region

- Go to Key Pairs, and click on "Create Key Pair"
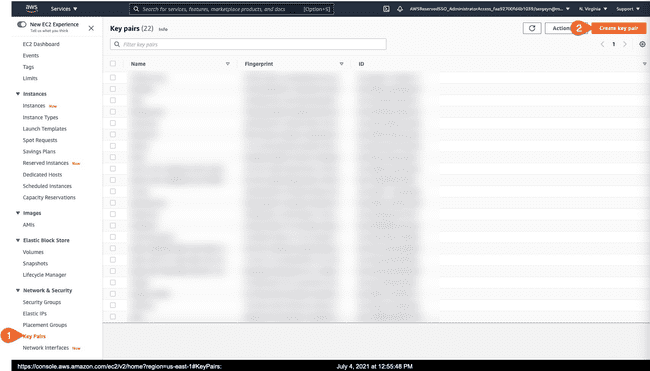
- Give the key a name (and make a note of it). For key file format, use PPK (but the keys can be converted later on), and click on "Create Key Pair
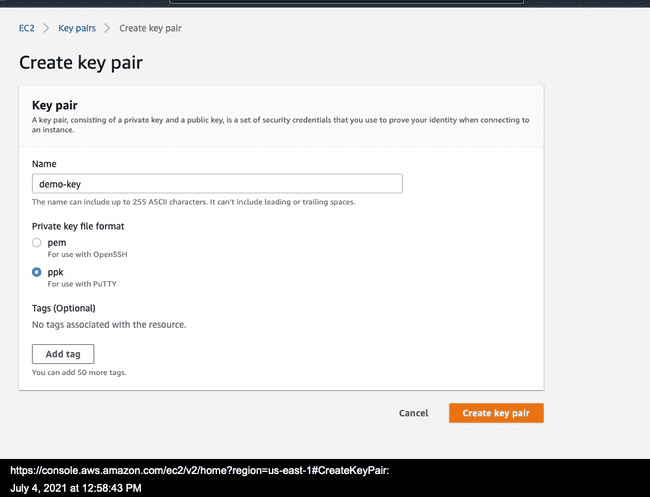
- This will download the private key. Keep that key safe. If cloud administrators created the key, they need to get that key to the end user in a secure way.
A user in Metworx can be configured to use the key that is configured in AWS. In the Metworx dashboard application, the end user can click on their name, and then Account, and type in the key name exactly same way as it was named in AWS
 .
.
Alternatively, OrgAdmins can configure the key when they create or update org users. (see https://kb.metworx.com/Admin/metworx_gui/User_Management/creating-user/#creating-users)
Once the key has been configured in the Metworx application for the user, the public key will be inserted into users ~/.ssh/authorized_keys file on the workflow, and the workflow owner can authenticate to the workflow with the corresponding private key.
2.2. Inserting Public SSH key in Already running Metworx Workflow
If you do not already have private/public key pair to use for authentication, please generate the key pair first.
2.2.1 Generating SSH KeyPairs
The sections bellow describe steps to generate keypairs on Windows or Linux/Mac
2.2.1.a On Windows, generate the private/public key Pair with PuttyGen application
Follow these steps to generate the key pair on Windows.
- Open PuttyGen, click on "Generate" and follow instructions from application to generate the key
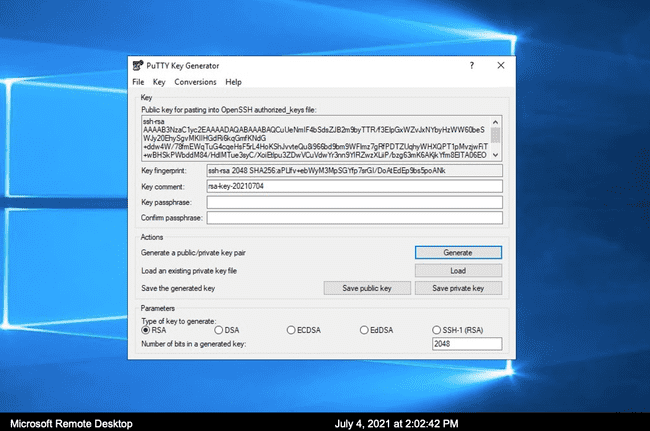
- Once the key pair has been generated, save both private and public keys.
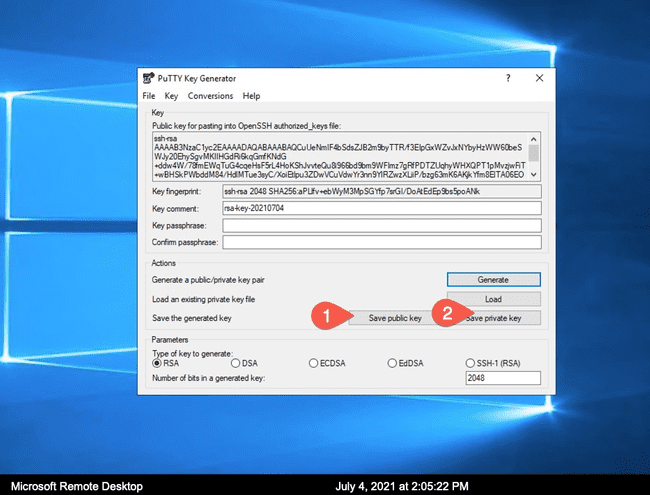 . You do not have to give it a password to protect it, but keep the private key very secure.
 - Copy and save contents of the OpenSSH formatted public key from the application
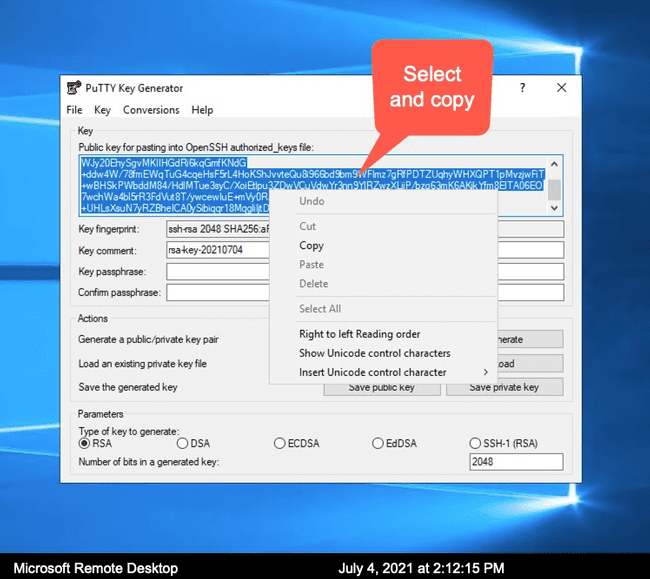
2.2.1.b Generating public/private key pair on Linux and Mac
On Linux, public/private key pairs can be generated by running ssh-keygen command on a terminal, as follows:
prompt % ssh-keygen -t rsa
Generating public/private rsa key pair.
Enter file in which to save the key (/Users/sergeyn/.ssh/id_rsa):
Enter passphrase (empty for no passphrase):
Enter same passphrase again:
Your identification has been saved in id_rsa
Your public key has been saved in id_rsa.pub.
The key fingerprint is:
SHA256:NJ+xTWLKe1seKcoiZXDAT48oP4obLryHYnWLew40n8Y sergeyn@Sergeys-MBP.fios-router.home
The key's randomart image is:
+---[RSA 3072]----+
|   .             |
|    o .          |
|     = oo + .    |
|  . o +o.= B     |
|   = o  S + .    |
|  ..*.+  .   .   |
|o.oooE. . o +    |
|==.o+o.. o = .   |
|=+o.+o .o . .    |
+----[SHA256]-----+

prompt % cat ~/.ssh/id_rsa.pub
ssh-rsa FAKEKEYCONTENTFORDEMO+ZUFFaL7MgWbmCsHk3Su3ZlAyrrjX3bSs1jVEvVbZDNVoUULxOdmThzkOXlCTsCtOZbtImFVwpbC08x8YxZ1Ce7EKTgMwWTAQucspy1Z3h2IVkMgBh7hr4fNWnN44FngtaBfYou5OB0CQo1iXThJmWpx8yxrgaUqYL7D4vp+NEDzP0SA95K9+0vIU4DqImUH4YkpSSV13Ypr7qB3GVSPnRSwG6WcB75c/QwKtBAXVBCuDExOGJ/r3hVZwv8SRXGYzF2T8wk9RZ1TWt1BzmYWrzz50YiAynDBf2xb3ES4x5GgMXR/o7C+JJ5lEBXRXgjw3iTf3Xo5FHnRQWjs/tR1lPbBkepkA1jTRPEv6yRvGNSSS+tc7a2Va//DCfwH0RinOnSPBZ9F67Vnu6486fkOmFep8xN26JYCMGsoFGqDT2Kw0qFuJXOFxkICm9T3rma6c8TIheNNWWFA9po9ePTiTVyvbTjLyWBCgy313ErbDRQvOPmtvi0zu2hdnJEM0= sergeyn@hostname
The contents of the public key (by default ~/.ssh/id_rsa.pub) can be copied and inserted into the ~/.ssh/authorized_keys file on a workstation
2.2.2. Connecting to workflow with a username/password and appending the public key to the ~/.ssh/authorized_keys file.
- Log into RStudio on a running workflow with your username and password, and open a session
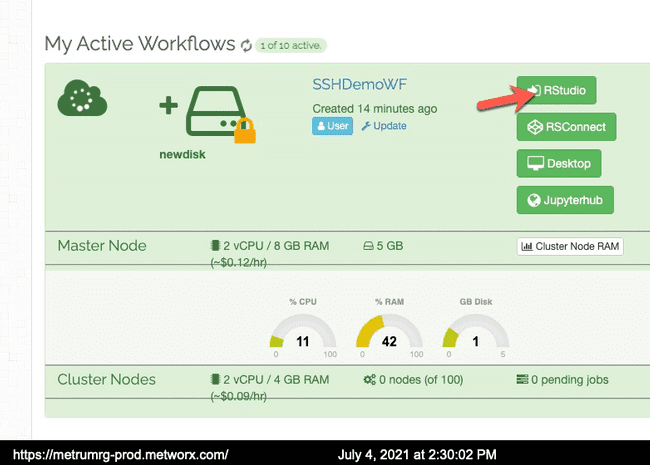
- In the RStudio file manager, enable "Hidden Files" option under "more" menu, and select
Home->.ssh->authorized_keys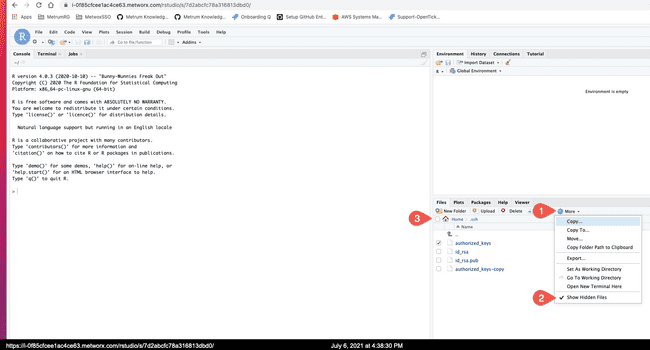
- With RStudio editor, edit the
~/.ssh/authorized_keysfile and append the public key there. (it will always be one line starting withssh-rsain our case) and save the file. There are usually multiple other keys in that file on a Metworx workflow node.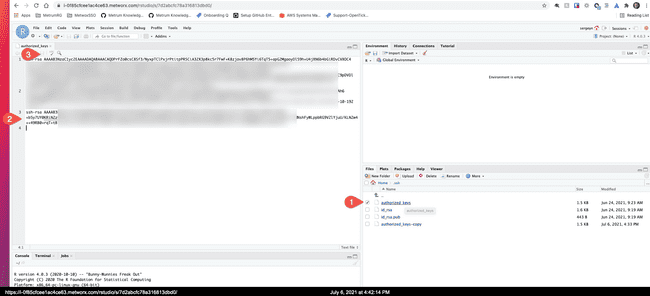
Note: On 20.x Metworx workflows, user's home directories are located on persistent disks, so the public key would only need to be added once on a new disk and it will persist between recreation of workflows, as long as same disk is used.
Now that public/private keys has been generated and the public key has been appended to the workflow user's authorized_keys file, the user can ssh in, or upload/download files, via ssh protocols. For more details, see ssh tutorial