NONMEM Warning - Job Not Allowed to Run
NONMEM Warning - Job Not Allowed to Run
Description of the Problem
This guidance pertains to a common warning when performing NONMEM operations on a workflow. When attempting to run a NONMEM model/job, you may notice one of the following "unexpected" messages:
-
Click here to see an example of a console warning
Unable to run job: warning: <your-user-name's> job is not allowed to run in any queue Your job <number> ("<model-name>") has been submitted Exiting. -
Click here to see an example errors you may find in a .cat output
cannot locate <file-name> in control stream for run cannot locate <another-file-name> in control stream for run cannot locate <other-related-file-name> in control stream for run Run <number> has exit code 1 - Running
qstat()may also indicate there are no worker nodes.
Solution
The good news is that the messages themselves indicate a problem has been recognized and is being addressed. Unless told not to, workflows generally shut down unused/latent compute nodes based on inactivity. This is generally a good thing as it helps you avoid incurring unnecessary usage costs for resources when they are not needed. In this case, the workflow has identified that it needs additional compute power to perform a task, and is provisioning additional compute power to facilitate the job you submitted.
In this case, what happens is that the workflow identifies:
- That it has no compute/worker nodes available; and
- That it needs additional compute power based on the model/job you are submitting.
- In the case of the console warning, the warning is basically saying it could not queue your job for the reason noted above, but that it is provisioning a new compute/worker node in order to address this.
- There may be additional/related error messages in your .cat output, which are basically expressing that it could not find other pieces related to this job (because this job is delayed pending provisioning additional compute node/s).
- This also explains why running qstat() indicates no worker nodes - there were none when you submitted the job, so the workflow is provisioning additional compute power to support the job.
No action is required, and this is actually indicative that things are working as designed. However, if you find this to be a common occurrence or a nuisance, you can configure your workflow to accomodate your needs accordingly.
Note: You can make this configuration when launching a workflow, or by selecting Update from the workflow dashboard to update an extant workflow (the fields you need to update are available in both the "New Workflow" configuration screen and the "Update Workflow" configuration screen).
-
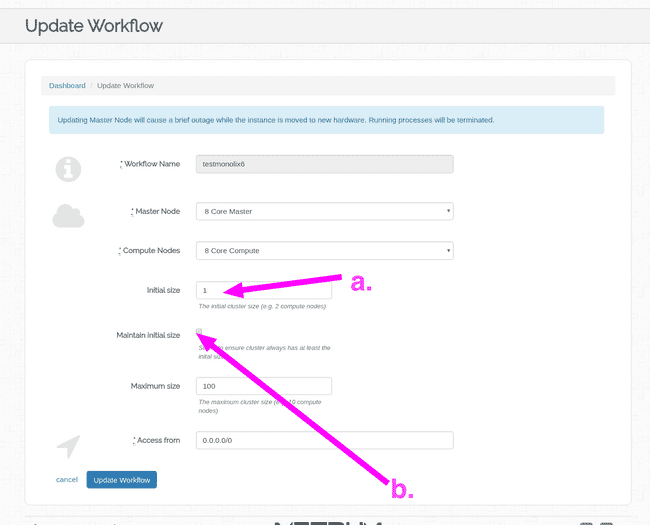
Regardless of whether you are updating or launching a new workflow, find the following fields in the workflow configuration screen, and make selections that fit your needs:
- a. Initial size - this allows you to specify the initial workflow cluster size (increasing this means when you launch a workflow, it will start off with the number of nodes you specify here).
- b. Maintain initial size - toggling this checkbox will specify whether or not the workflow can
shut down inactive/latent compute/worker nodes (which it will do if unchecked). Checking this box
will cause the workflow to maintain the number of nodes you specified in a above.
