Additional Publishing Scenarios
In this doc we will cover different publishing scenarios/situations you may encounter while using RStudio Connect.
Updating Apps as a Collaborator
Updating apps as a collaborator is also very easy!
As a collaborator you'll just need to just Sign Up as a user at the owner's workflow RStudio Connect instance.
Once that's done, the administrator of the instance will need to do the following:
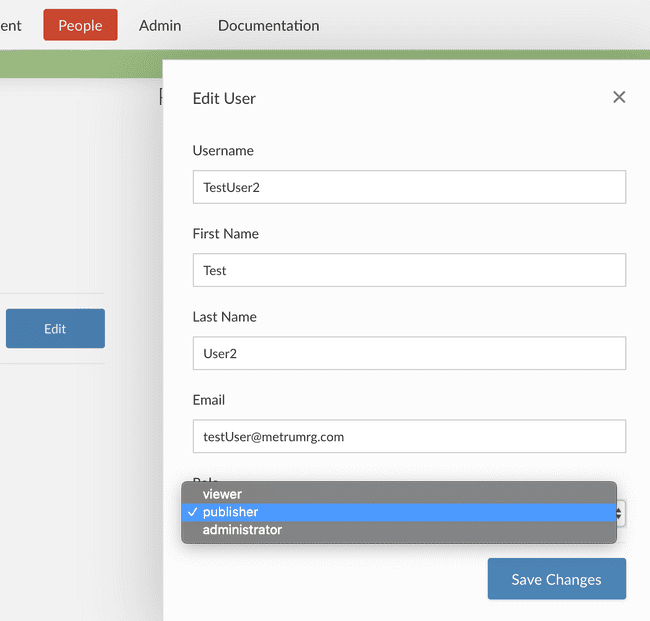
- Change the user's status from viewer to publisher or higher. This can be done by navigating to the People tab, clicking on the user you wish to change, and then Edit:
- After that you'll need to add the user as a collaborator. You can do this by going to your the app's settings page and adding/modifying the user underneath Who can view or change this Application:
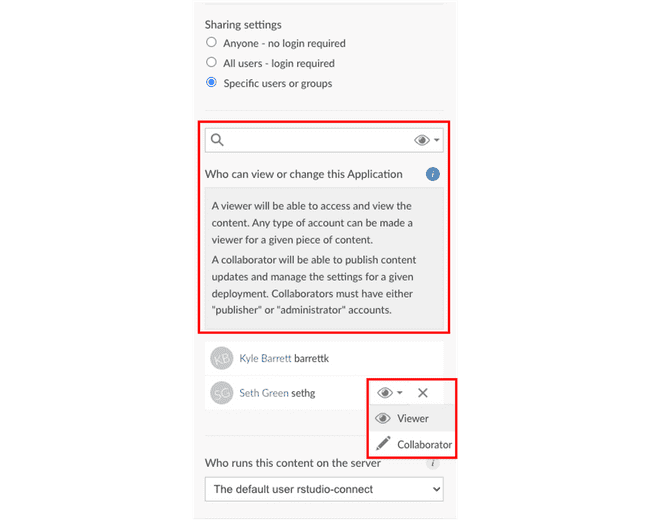
As a collaborator, you can do a couple things depending on your needs. A collaborator is able to:
- Change the app URL (vanity path)
- Change Who can view or change this Application
-
Update the same app instance (i.e. URL)
- If you and your collaborators intend to publish to the same app instance, see the section below.
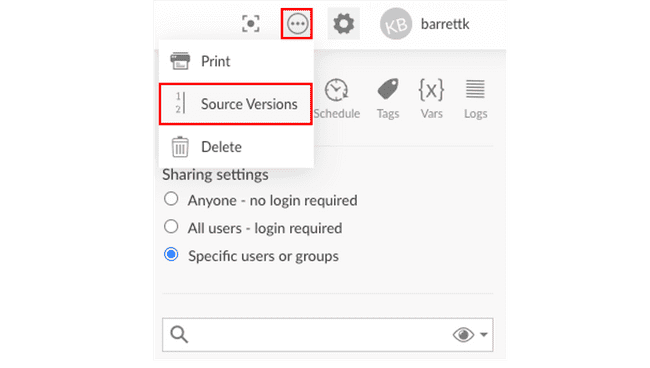
- Download a zip file of all deployed versions:
Collaborating Across Machines
In a scenario where you're working with a group of collaborators on an app, all of you will need to have access to updating the same app across different machines. This can be done by following the steps above. In order to ensure you are all updating the same app instance, you will need the shiny app's appId and must follow the controlled deployment method (i.e. using a deploy script) seen here.
If you don’t use the same appId, rather than updating the same deployed app, you will instead publish a new version under a different URL.
If you used the Publish Button during the initial deployment, or are otherwise unsure how to find out the appId, simply navigate to the generated rsconnect folder on the machine that performed the initial deployment and follow the following steps:
- navigate to
rsconnect/<shiny_server_url>/<user>/<app_name>.dcf -
It should look something like this:
name: <app_name> title: <app_title> username: <user> account: <user> server: shiny-apps.metworx.com hostUrl: https://shiny-apps.metworx.com/rsconnect/__api__ appId: 36 bundleId: 192 url: https://shiny-apps.metworx.com:443/rsconnect/content/36/ when: 1638309809.95214 lastSyncTime: 1638309809.95215 asMultiple: FALSE asStatic: FALSE - As seen above, your
appIdis right there! Simply grab that number and follow the steps outlined in the controlled deployment method.
Hosting and Scaling Considerations
The easiest way to host a shiny app for multiple users is to maintain an active workflow, and disseminate the RSconnect URL to anyone who needs access to the apps hosted on that workflow. As outlined above, access can be managed in RSConnect directly.
Some options:
-
Have a dedicated workflow for hosting all applications (recommended)
-
Make sure the workflow has enough cores; depending on the number of applications, number of users, and how heavy the computation is per application.
- You can always increase or decrease the number of cores as the above variables change by updating your workflow.
-
- Have multiple dedicated workflows, depending on the nature of applications or users that need access (though you can always manage this in RSConnect).
- Have individual shiny developers handle the hosting.
Active Development
For active shiny development and deployment, it is much more important for the code to be reproducible and version controlled.
- Shiny related packages update often. You’ll want to lock down package versions, function updates, etc. so that nothing unexpected happens during deployment
-
MPN, pkgr, and renv are highly recommended for shiny app development, especially when involving collaborators, as that will ensure you are all using the expected package versions.
- More details on motivation and set up for this can be found in R Package Management
Scaling Considerations
- Its important to think about how many users will be visiting one or more of your hosted apps, as well as how computationally heavy they are individually.
-
If you expect to have 10+ visitors active at any given time, you'll want to make sure your workflow specifications are good enough to account for that traffic.
- If you experience significant wait times or timeouts you may want to look at shiny async or potentially outsourcing expensive computations to the grid.
Lets look at a couple scenarios...
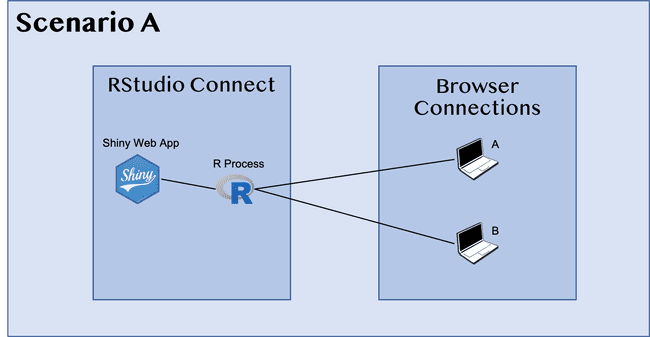
Scenario A
-
Both users are linked to the same R process
- Since R is single threaded, If both user A and user B change an input that triggers R calculations, the requests will be handled sequentially.
- In other words, User B would have to wait for user A’s calculation to complete before their calculation even begins.
- This option is better when the bootup time is slow (e.g., loading in a large dataset), but the server calculations are fast.
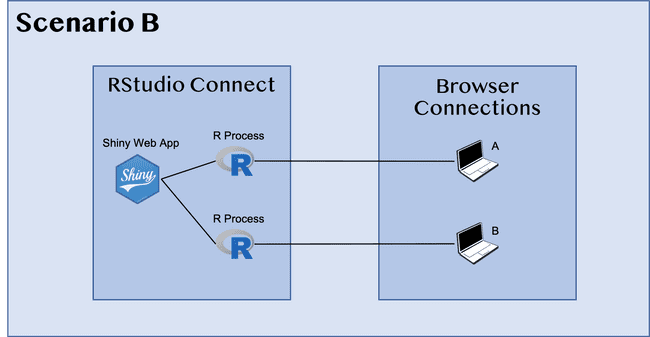
Scenario B
-
Each user has their own R process
- If both user A and user B change an input that triggers R calculations, the requests will be handled simultaneously.
- This option is better when the bootup time is fast (e.g., minimal data to load during startup), but the server calculations are slow.
Comparison
-
The memory usage in Scenario B is twice that of Scenario A
- (Because there are 2 R processes)
-
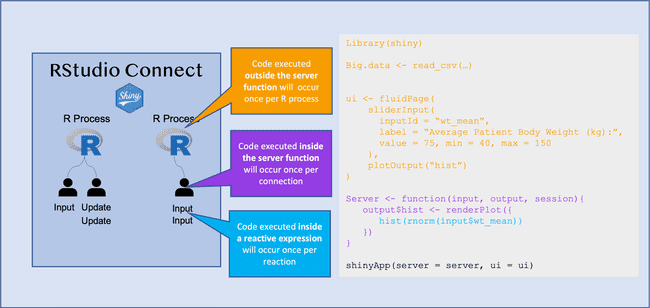
Initializing the shiny app (i.e. spinning up an R process and running the shiny code) will take longer in Scenario B
- Code run outside of the server will execute before the
shinyAppobject is created.
- Code run outside of the server will execute before the
- The application would be more responsive to users after the web page is loaded in Scenario B, but it will take longer for them to connect initially
RSConnect Decision Tree
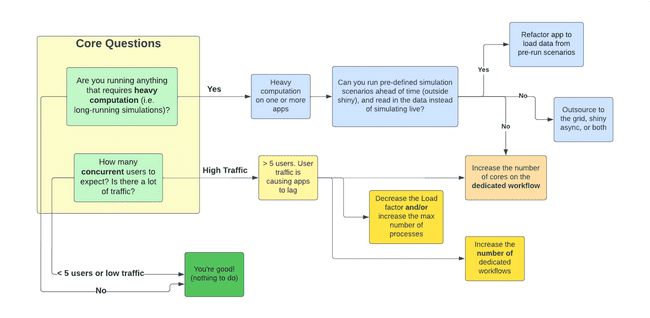
Below is a high level decision tree that our developers go through when deciding what (if anything) needs to be done to improve shiny app performance.
Some Definitions
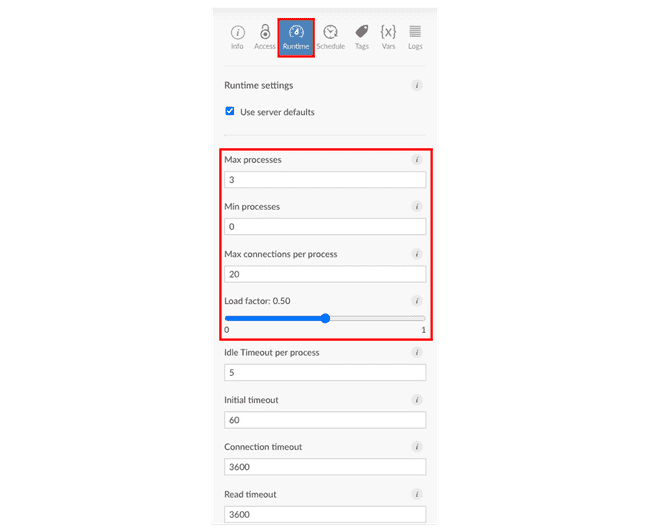
- Max processes - The maximum number of processes that will ever be simultaneously running for this content, regardless of load. Default value is 3.
-
Max connections per process - The maximum number of connections per process. Default value is 20.
- A connection is an app instance. So connections per process is how many instances of the app can be running per process. The number of connections will often scale 1:1 with the amount of individual users, though this is not always the case (such as when users open multiple instances of the app).
Max processes x Max connections per process = total number of possible concurrent connections
-
Load factor - A value between 0 and 1 which determines how lazily additional processes will be spawned to handle incoming load for this process. Default value is 0.5.
- A value close to 0 means new processes will be spun up aggressively to try and keep the number of connections per process small.
- A value close to 1 means the number of connections per process will be close to max connections.
You can change the settings referenced above by navigating to the Runtime tab within the app you're trying to manage:
